
Advanced Module – Databases (Access)
Lesson 2 – Advanced Tables and Field Properties
This lesson covers advanced table design features in Access, including data types, field properties, input masks, default values, validation rules and lookup fields. These skills support accurate data entry and strong database structure.
1. Data types (advanced use)
Choosing the correct data type ensures accuracy, improves performance and prevents invalid values.
- Short Text – up to 255 characters (names, codes).
- Long Text – long descriptions or notes.
- Number – numeric values (requires correct Field Size).
- Currency – money values; prevents rounding errors.
- Date/Time or Date/Time Extended – precise date/time storage.
- Yes/No – True/False values.
- AutoNumber – automatically generated IDs, typically used for primary keys.
- Lookup Wizard – creates drop-down lists from another table or value list.
How to change a data type
- Open the table in Design View.
- Select the field.
- Choose a data type from the Data Type drop-down list.
- Save the table (Access may warn if existing data could be lost).
2. Field size and format
Field Size controls storage requirements and valid numeric ranges.
- Integer / Long Integer – whole numbers.
- Single / Double – decimal values.
- Smaller field sizes improve performance.
Format controls how values appear:
- Currency (£)
- Short Date (dd/mm/yyyy)
- Percentage (%)
How to set field size and format
- Open the table in Design View.
- Select a Number or Currency field.
- Set Field Size (e.g. Long Integer).
- Set Format (e.g. Currency, Short Date).
3. Default values
Default Value automatically fills a field when a new record is added.
- Default OrderDate to Date().
- Default Country to “United Kingdom”.
How to set a default value
- Open the table in Design View.
- Select the field.
- In Field Properties, enter a value in Default Value.
- Save the table.
4. Input masks
Input masks control the pattern of data entry, such as phone numbers or postcodes.
How to add an input mask
- Open the table in Design View.
- Select a text field (e.g. PhoneNumber).
- In Field Properties, click the Input Mask field.
- Click the … button to open the Input Mask Wizard.
- Choose a built-in mask or create a custom one.
- Finish the wizard and save.

5. Validation rules and messages
Validation rules prevent invalid data from being saved, improving data integrity.
- Field-level validation – applies to a single field (e.g. Quantity >= 0).
- Table-level validation – checks conditions between multiple fields.
Example field validation rule
For a DiscountPercent field:
- Validation Rule: Between 0 And 100
- Validation Text: “Discount must be between 0 and 100.”
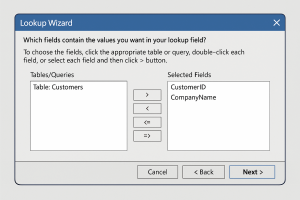
6. Lookup fields (combo boxes in tables)
Lookup fields allow users to select a value rather than type it, reducing errors.
Creating a lookup field from another table
- Open the table in Design View (e.g. Orders).
- Select the field name (e.g. CustomerID).
- Set Data Type to Lookup Wizard….
- Select “I want the lookup field to get values from another table”.
- Choose the related table (e.g. Customers).
- Select key and descriptive fields (CustomerID, FullName).
- Hide the key field if appropriate.
- Finish the wizard and save.
7. Indexing fields
Indexes improve performance when searching or sorting.
- Index fields that are searched often (Surname, Postcode).
- Avoid indexing every field — this increases file size.
- Use No Duplicates indexing when unique values are required.
How to set an index
- Open the table in Design View.
- Select the field to index.
- In Field Properties, change Indexed to:
- Yes (Duplicates OK)
- Yes (No Duplicates)
- Save the table.
8. Practical Activity
- Open your database and choose one main table.
- Adjust at least three fields to better data types or field sizes.
- Add a Default Value and a Validation Rule to one numeric field.
- Add an Input Mask to a phone or postcode field.
- Create a Lookup field that pulls values from another table.
- Index a field that users will commonly search.