
Advanced Module – Word Processing
Lesson 3 – Tables, Columns, Tabs & Document Layout
This lesson shows you how to use tables, multi-column layouts, tabs and borders to control the structure and layout of a document. These skills support the ICDL Documents (Advanced) formatting objectives for tables and columns and help you produce clear, professional documents.
1. Creating and Inserting Tables
Tables organise information into rows and columns, making it easier to read and compare data.
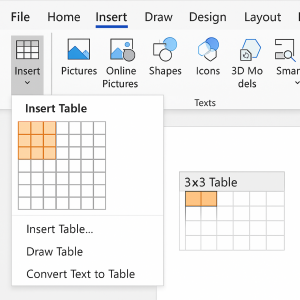
How to insert a table:
- Go to Insert > Table.
- Move across the grid to select the number of columns and rows.
- Click to insert the table into your document.
2. Adding and Removing Rows and Columns
You can change the structure of a table at any time by inserting or deleting rows and columns.
- Click anywhere inside the table.
- Go to the Table Layout (or Layout) tab under Table Tools.
- In the Rows & Columns group, choose:
- Insert Above – add a row above the current one.
- Insert Below – add a row below.
- Insert Left – add a column on the left.
- Insert Right – add a column on the right.
- To delete: select the row or column, then choose Delete (Rows or Columns) on the Layout tab.

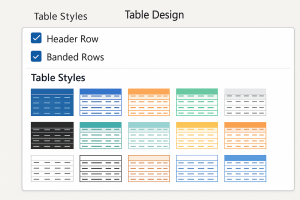
3. Table Formatting and Design
Table formatting helps emphasise headings, separate sections and improve readability.
The Table Design tab allows you to control:
- Table Styles – ready-made designs with borders and shading.
- Header Row – emphasises the first row.
- Borders – which gridlines are visible.
- Shading – cell background colour.
- Banding – alternate row or column shading.
Common table formatting steps:
- Select the whole table (or specific cells).
- Go to Table Design.
- Choose a suitable table style (for example, banded rows with a header row).
- Adjust borders or shading if required.
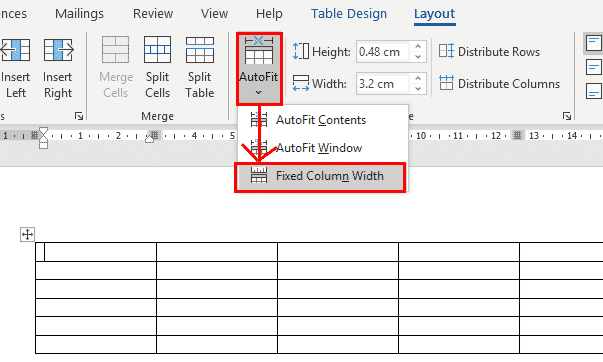
4. Column Resizing and AutoFit
You can adjust column width and row height manually, or let Word fit them automatically.
To resize columns manually:
- Point at a column border until the double-headed arrow appears.
- Drag left or right to change the width.
To use AutoFit:
- Select the table.
- Go to Table Layout > AutoFit.
- Choose:
- AutoFit Contents – adjusts columns to fit the text.
- AutoFit Window – stretches the table to the page width.
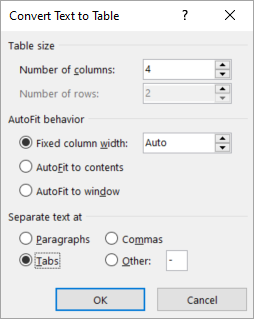
5. Converting Text to a Table (and Back)
This is useful when you already have data separated by tabs, commas or other characters.
To convert text to a table:
- Select the block of text.
- Go to Insert > Table > Convert Text to Table.
- Choose the number of columns and select the correct separator (tabs, commas, etc.).
- Click OK.
To convert a table back to text:
- Select the table.
- Go to Table Layout > Convert to Text and choose a separator (tabs, commas, etc.).
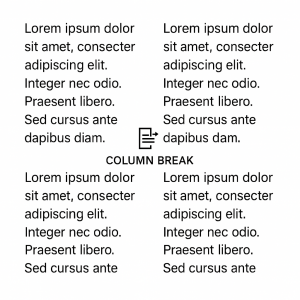
6. Working with Columns (Multi-Column Layout)
Columns are often used in newsletters, brochures and reports to improve readability.
To apply columns:
- Select the text or section.
- Go to Layout > Columns.
- Choose One, Two, Three, or select More Columns… for custom settings.
To insert a column break:
- Place the cursor where you want the next column to begin.
- Go to Layout > Breaks > Column.
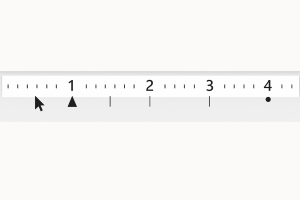
7. Using Tabs for Alignment
Tabs give precise alignment for text such as prices, dates or times. They are more accurate and easier to update than using spaces.
Types of tab stop:
- Left tab – text extends to the right of the tab stop.
- Right tab – text extends to the left.
- Centre tab – text is centred on the tab position.
- Decimal tab – aligns numbers at the decimal point.
How to add and use a tab stop:
- Show the ruler (View tab → tick Ruler if needed).
- Click on the ruler at the position where you want the tab stop.
- Press Tab while typing to jump to that position.
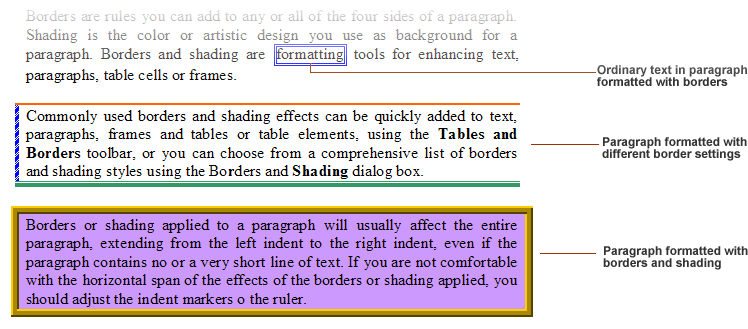
8. Borders and Shading for Layout
Borders and shading can be used to highlight paragraphs, headings and key sections.
- Select the paragraph or text.
- Go to Home > Borders.
- Choose:
- Top Border or Bottom Border for lines above or below text.
- Box to outline the text.
- Shadow or other styles for emphasis.
- No Border to remove borders.
9. Good Practices for Tables, Columns and Layout
- Use tables to present data, not to create spacing or page layout.
- Keep table styles simple and easy to read.
- Use column breaks instead of pressing Enter repeatedly.
- Use tabs for alignment instead of multiple spaces.
- Check Print Preview after making layout changes.
10. Practical Activity
- Create a table with 4 columns and 5 rows, including a header row.
- Apply a table style with banded rows and header shading.
- Resize columns manually, then use AutoFit Contents.
- Type a short list separated by tabs and convert it to a table, then convert it back to text.
- Create a two-column section in your document and add a column break.
- Add tab stops on the ruler and align three items such as product, description and price.
- Apply paragraph borders to highlight one key section, then remove them.