
Advanced Module – Word Processing
Lesson 4 – Styles, Templates and Automated Features
This lesson explains how to use styles, themes and templates to create professional documents quickly and consistently. You will also learn how to use built-in automation features to speed up formatting and work more efficiently.
1. What are Styles?
Styles are pre-set collections of formatting options applied to text. A style can control font, size, colour, spacing, alignment and more. Using styles keeps your document consistent and makes large documents much easier to update. Insert Image Placeholder: “Styles Gallery in Word”
Why use styles?
- Keep headings and body text consistent throughout the document.
- Update all occurrences of a style in one step.
- Generate automatic tables of contents based on heading styles.
- Improve structure and accessibility of the document.
2. Applying and Modifying Styles
How to apply a style:
- Select the text you want to format.
- Go to the Home tab.
- In the Styles group, choose a style (for example, Heading 1, Heading 2, Normal, Quote).
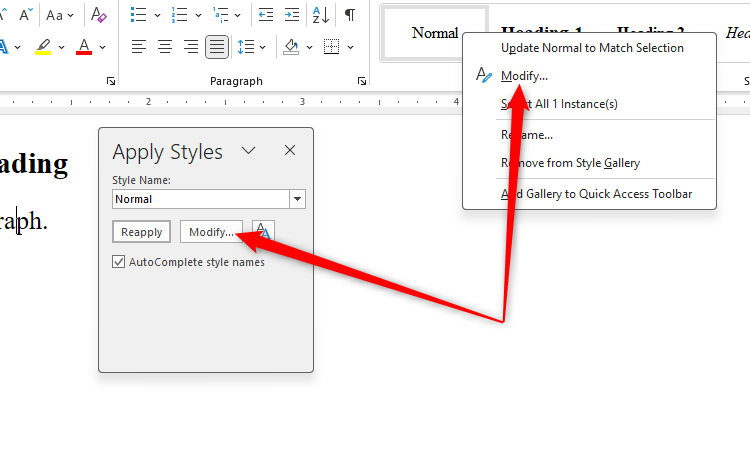
To modify an existing style:
- In the Styles gallery, right-click the style you want to change.
- Select Modify….
- Update font, size, colour, alignment, spacing or other options.
- Choose whether changes apply to the current document only, or to new documents based on the template.
- Click OK to update all text that uses that style.
3. Creating New Custom Styles
Custom styles allow you to define your own look for special elements such as subheadings, warnings or examples.
Steps:
- Format a piece of text the way you want it to appear (font, size, spacing, etc.).
- Go to Home → Styles → Create a Style (or New Style in the Styles pane).
- Give the style a meaningful name (for example, “Subheading – Blue”).
- Click Modify… for more options such as paragraph spacing or outline level.
- Click OK to save the new style to the document.

4. Using Templates
Templates are pre-designed documents that include built-in styles, layouts, headings and sometimes sample content. Using a template saves time and ensures a consistent look for similar documents.
Common template types:
- Reports
- Newsletters
- CVs / résumés
- Business letters and forms
How to create a document from a template:
- Go to File → New.
- Browse the available categories or use the search box (for example, type Report or Newsletter).
- Select the template you want to use.
- Click Create to open a new document based on that template.
:max_bytes(150000):strip_icc()/004-how-to-create-and-use-microsoft-word-templates-bc1e3865516c40ea8eac8a2379913c25.jpg)
5. Saving Your Document as a Template
If you regularly create the same type of document (for example, monthly reports), it is efficient to save your own template.
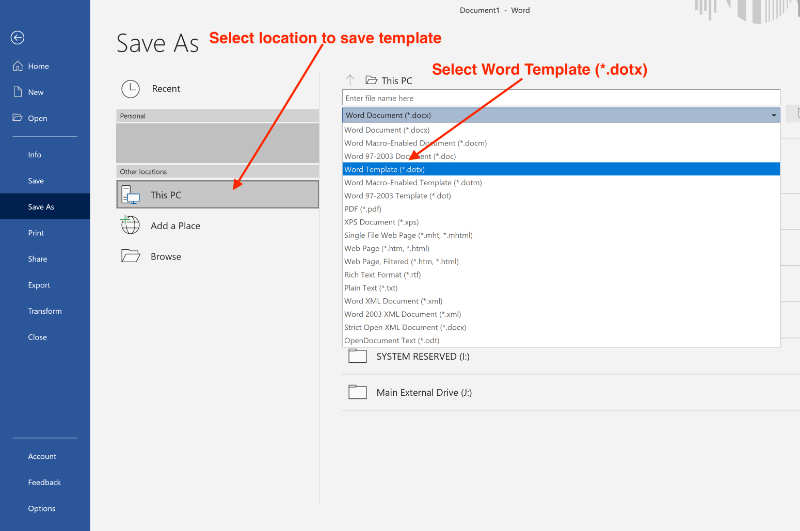
Steps:
- Set up your document with styles, headings, page layout, headers/footers and any placeholders you need.
- Go to File → Save As.
- Choose a location.
- In the file type list, select Word Template (*.dotx).
- Give the template a clear name and click Save.
6. Themes (Colours, Fonts and Effects)
Themes control the overall visual style of your document. A theme defines a coordinated set of colours, fonts and effects that can be applied to the whole document.
To apply a theme:
- Go to the Design tab.
- Click Themes.
- Hover over different themes to preview them.
- Click a theme to apply it to the document.

7. Using the Navigation Pane
The Navigation Pane helps you move quickly through long documents and reorganise sections. It works best when you use heading styles.
To open the Navigation Pane:
- Go to the View tab.
- Tick Navigation Pane.
- Click a heading in the Navigation Pane to jump to that section.
- Drag a heading up or down to reorder whole sections (the heading and its content move together).

8. Automatic Numbering for Headings
Automatic numbering works with heading styles to create structured, multi-level documents such as reports or manuals.
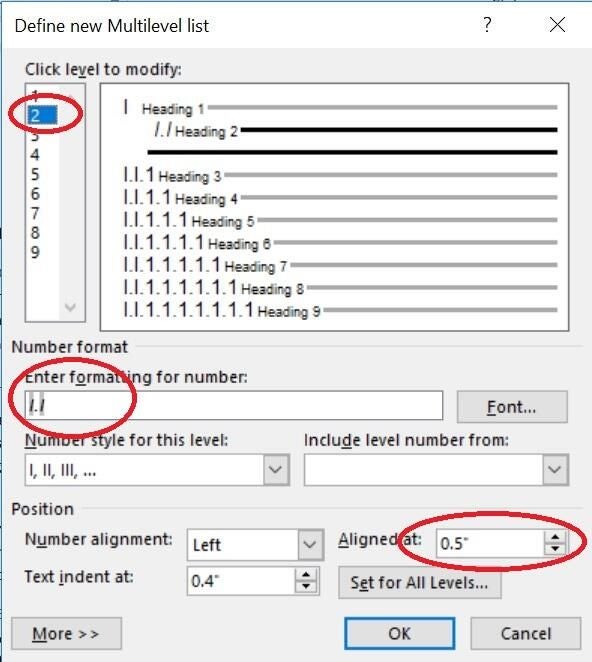
Steps:
- Apply Heading 1, Heading 2, etc. to your headings.
- On the Home tab, click Multilevel List.
- Choose a numbered heading style that links to Heading 1, Heading 2 and Heading 3.
- Type your headings; numbering will update automatically as you add or rearrange sections.
9. Good Practices for Using Styles & Templates
- Use built-in heading styles instead of manually changing font size and bold.
- Modify styles rather than formatting each paragraph individually.
- Use templates for documents you create regularly (for example, reports or letters).
- Apply a theme to keep colours and fonts consistent across your organisation.
- Avoid creating many similar styles with only small differences.
10. Practical Activity
- Create a new document and add at least three levels of headings (Heading 1, Heading 2, Heading 3).
- Apply a theme from the Design tab.
- Modify one style (for example, Heading 2) to change font, colour and spacing.
- Create a custom style for sub-headings and apply it to several paragraphs.
- Save the document as a template file (.dotx).
- Use the Navigation Pane to move one section to a different position.