
Advanced Module – Word Processing
Lesson 5 – Mail Merge and Labels
This lesson explains how to use Mail Merge to create personalised letters, emails and labels by combining a main document with a list of data. Mail Merge is an essential productivity tool for sending the same document to many different recipients.
1. What is Mail Merge?
Mail Merge creates multiple personalised documents by combining:
- Main document – for example, a letter, email, envelope or label layout.
- Data source – a list of recipients, such as names and addresses.

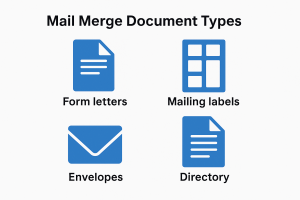
2. Types of Mail Merge
- Form letters – personalised letters sent to many people.
- Email messages – customised bulk email using Outlook.
- Address labels – sheets of printed labels using Avery templates.
- Envelopes – automatic addressing for envelopes.
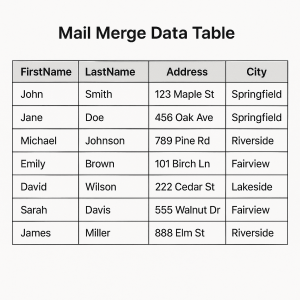
3. Data Sources
The data source contains the list of recipients and fields that will be merged. Word can use:
- A Word table
- An Excel spreadsheet
- An Access database
- Your Outlook/Contacts list
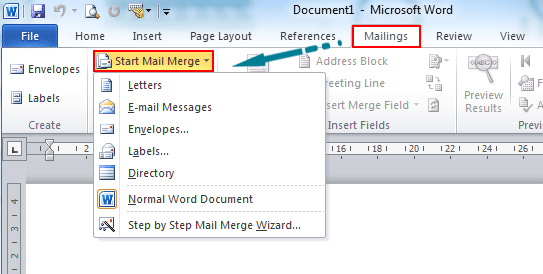
4. Setting Up a Mail Merge
You can use the Mail Merge Wizard or the Mailings tab to begin.
- Open the main document (letter, labels, etc.).
- Go to Mailings → Start Mail Merge.
- Select the document type (Letters, Labels, Email Messages, Envelopes).
- Choose or create a data source.
- Link the source to your document.
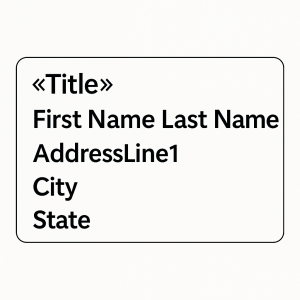
5. Inserting Merge Fields
Merge fields act as placeholders for personalised data.
- Place the cursor where the data should appear.
- Click Insert Merge Field.
- Select fields such as «Title», «FirstName», «LastName», «AddressLine1», «Postcode».
Insert Image Placeholder: “Insert Merge Field Dropdown”
6. Previewing and Completing the Merge
- Click Preview Results to see how each record will look.
- Use the arrows to navigate through recipient records.
- Click Finish & Merge to:
- Create individual documents
- Send emails
- Print letters or envelopes
![]()
7. Creating Labels with Mail Merge
- Go to Mailings → Start Mail Merge → Labels.
- Choose label brand and product number (e.g., Avery L7163).
- Insert merge fields into the first label.
- Click Update Labels to copy fields to all labels.
- Preview and complete the merge.
8. Filtering and Sorting Records
You can choose which recipients are included.
- Filter – include only certain recipients (e.g., “Town = Manchester”).
- Sort – order the list by surname, postcode, or any field.
- Go to Mailings → Edit Recipient List to filter or sort.

9. Good Practices for Mail Merge
- Always proofread the main document before merging.
- Check several preview records for spacing and line breaks.
- Ensure the data source is up to date and contains no duplicates.
- Avoid blank rows in Excel as they may disrupt the merge.
- Save the data source in the same folder as the main document when possible.
10. Practical Activity
- Create an address list with at least eight records (Name, Address, Town, Postcode).
- Write a standard letter that includes a greeting and address block.
- Insert merge fields for each recipient.
- Preview your records and fix any spacing issues.
- Complete the merge to a new document.
- Create a sheet of address labels using the same data.
- Filter the data to show only one town, then re-run the merge.